Showing posts with label Dessert. Show all posts

Tuesday, September 16, 2014

Brown Butter Chocolate Chip Cookies


These cookies, my friends, are my most requested recipe.  And, until now, I have selfishly held it very close to me.

I have made these cookies with brown butter and regular melted butter, and both ways are very good.The brown butter adds a depth of flavor to these cookies that makes them irresistible.  The melted butter makes them taste almost pastry-like.  You can't go wrong either way, but since I am a brown butter fiend, I almost always opt for that.

Also, there are oats in these cookies, but I don't consider them an oatmeal cookie, at least not in the traditional sense.  I've added just enough oats to this recipe to give the cookies a chewy texture that is divine. Even if you're not an oatmeal cookie fan, give em a try.  I think you just might fall in love.

I always have a bag of these cookies in my freezer.  Almost every day, after things start going down hill (because this usually happens at some point every day, right?) I sneak away from the girls into a corner of the kitchen (or bathroom, or basement, or bedroom) and gobble one down.  I think of it as my "secret cookie", and always chuckle a bit to myself as I am snarfing it down.  And then, my day is instantly better!  Well, at least for those 46 seconds I am blissfully alone with crumbs falling down the front of my shirt.  Luckily, I've never gotten caught.  Please don't tell...?

Brown Butter Chocolate Chip Cookies

14 tablespoons unsalted butter
3/4 cup (5 1/4 oz) packed brown sugar
1/2 cup (3 1/2 oz) granulated sugar
1 teaspoon kosher salt
2 teaspoons vanilla extract
1 large egg, plus 1 large egg yolk
1 3/4 cups (8 3/4 oz) all-purpose flour
1/2 teaspoon baking soda
3/4 cup (3 oz) old fashioned rolled oats
1 1/4 cups (7 1/2 oz) dark chocolate chopped or chips
3/4 cup nuts, toasted and chopped (optional)

Preheat oven to 375F.

Melt 10 tablespoons butter in a skillet over medium-high heat.  If opting to brown the butter, cook, swirling the pan often, until the butter turns a deep golden brown, about 3-4 minutes.  Transfer the butter to a heat proof bowl and then add the remaining 4 tablespoons of butter.  Stir until the butter is completely melted.

Add brown sugar, granulated sugar, salt and vanilla to the butter. Whisk, by hand or on medium-low with the whisk attachment to a stand mixer, until fully incorporated.  Add the egg and egg yolk and whisk until fully incorporated. Let the mixture stand for 3 minutes and then whisk for 30 seconds.  Repeat the process of resting and whisking 2 more times.  At this point the mixture will be smooth, thick and glossy.

In a separate bowl, combine the flour, baking soda and oats and stir to combine.  Using a rubber spatula, add the flour mixture to the butter mixture and stir until just combined.  Stir in the chocolate chips and nuts, if using.

Using a 2 tablespoon cookie scoop, or just eyeballing it, drop dough balls 2 inches apart onto a parchment lined cookie sheet.  Bake until cookies are golden brown and puffy and edges have begun to set but middles are still soft, about 11-13 minutes.  Transfer to a cooling rack, and if you can stand to wait, allow to cool to room temperature.  If not, just go ahead and...

EAT IT!!

Tuesday, September 17, 2013

Raspberry Streusel Bars


Something I love about our new lives is the absolute presence of my husband.  For the past three years he was so engulfed by grad school, that being completely present was, understandably, challenging.  These past couple months, since he started working, he has been 110% present in everything we do.  We get out and do things without a deadline and with total leisure.  We enjoy each other, our children, basking in the indulgence of just being together. Oh, the simple pleasures.

Last weekend we decided to take a family outing to Afton Apple Orchard to pick raspberries and apples.  If you know anything about my eldest, its that this girl loves berries more than almost anything on earth.  Girlfriend would eat them breakfast, lunch and dinner if we could afford it.  So, this was obviously heaven on earth to her.  At first, the price of $4/pint seemed steep to us for pick-your-own raspberries...until we realized that we all likely ate our weight in raspberries while we were picking them.


It was a day that was so hot and humid that it was hard to breathe, but it didn't matter an ounce.  We were together, and we were basking in the hot sweaty glow of our togetherness.

We gorged on raspberries and apples.


There was a petting zoo and we met this guy.

Llamas are hilarious by the way.

And when we got home, I made these delicious raspberry bars.  Actually, delicious doesn't quite capture the essence of these bars.  Amazing, awesome. So. Damn. Good. There is 18 tablespoons of butter in one little 9' x 13" pan.  If that doesn't clear up how good these bars are, then you probably don't know anything about butter (I forgive you)...but you'll still love these bars.


PRINT THIS RECIPE

Raspberry Streusel Bars
Serves 12-15
Adapted from Cooks Illustrated

2 1/2 cups (12 1/2 ounces) all-purpose flour
2/3 cup (4 2/3 ounces) granulated sugar
3/4 teaspoon kosher salt
1 cup (2 sticks) + 2 tablespoons unsalted butter, divided, cut into 1" pieces and softened
1/4 cup packed (1 3/4 ounces) brown sugar
1/2 cup (1 1/2 ounces) old-fashioned rolled oats
1/2 cup pecans, finely chopped
3/4 cup (8 1/2 ounces) raspberry jam
3/4 cup (3 1/2 ounces) fresh raspberries

Adjust oven rack to middle and preheat oven to 375F.  Line 9" x 13" pan with tin foil, allowing it to hang over the edges to easily remove the bars later.  Grease foil and set aside.

Using a stand mixer fitted with the paddle, mix flour, granulated sugar and salt on low speed until combined.  Add the 1 cup of butter a piece at a time, then continue mixing until the mixture resembles wet sand, about 1 to 1 1/2 minutes.

Measure 1 1/4 cups loosely packed flour mixture into a separate medium bowl and set aside.  Dump the rest of the flour mixture into the prepared pan and, using clean hands, firmly and evenly press the mixture into place to cover the bottom of the pan.   Bake until the edges begin to brown, about 14 to 18 minutes.

Meanwhile, add brown sugar, oats and pecans to the reserved flour mixture and stir with a wooden spoon until combined.  Add the remaining 2 tablespoons of butter and work it into the mixture by rubbing it between your fingers until the butter is incorporated.

Combine jam and raspberries in a small bowl and mash gently with a fork until combined but some raspberry pieces remain.

Spread jam mixture evenly over the hot crust.  Sprinkle the streusel topping evenly over the jam, but do not press it into the topping.  Return pan to the oven and bake until the streusel is a deep golden brown and the jam is bubbling, about 22 to 25 minutes.

Allow to cool to room temperature on a wire rack for 1 to 2 hours, then remove the bars from the pan by lifting the overhanging foil.  Cut into squares to serve, and then you most certainly should...

EAT IT!!


Monday, July 2, 2012

Camouflage Cake


My dear friend Ashley got married about a month ago (you know the one who's shower I turned into Foodzilla while planning?) to a man made perfectly for her.  This wedding was positively oozing with love, good vibes, and the absolute knowledge that this was a marriage made to last.

As all good brides do, Ashley put a ton of time, energy and forethought into exactly how she wanted their big day to be executed.  One of these details was in the form of a groom's cake for her beloved.  Since the groom is an avid hunter she encouraged him to put bits of camouflage into the decor of their wedding, but each time he shied away from it.  Little did he know she had a major camo surprise planned for him, and she asked me to make it for him.  A camouflage cake!


GULP.  I mean, this was my wedding cake debut!  And it was for one of my dear friends' wedding no less.  Oh yeah, and besides the occasional birthday cake for a friend's birthday, I don't really have much cake decorating experience.  But I was up for the task...and I think I did alright.


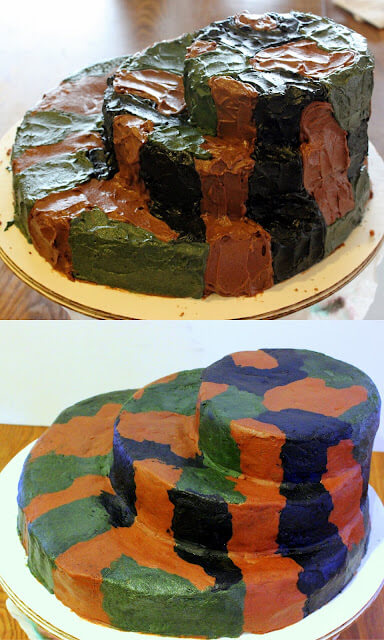
I was a little intimidated and did crazy amounts of research and several renditions of this cake before the big day.  After my obsessive research (and a miserable attempt at camo fondant) I decided to use the VIVA paper towel method (great video tutorial here) for smoothing the icing.

For this method you need to use a crusting buttercream recipe, the one I used is below, and a roll of VIVA paper towels.  Why VIVA?  Because they do not have a pattern on them and are perfectly smooth.  I started by piping the design for the camouflage pattern onto the cake.  Then, I put the whole cake in the fridge for about an hour for the frosting to set up, or crust.  You will know that your frosting has crusted when you touch the frosting with your finger and it doesn't leave any on your finger.  It should feel slightly stiff  but it won't be hard.

Once the frosting had crusted I used a VIVA paper towel and laid it over the top of the cake and very lightly smoothed it with my finger.  (Some people use an offset spatula, but I found that my finger left a smoother finish because I could feel the bumps and lumps beneath the paper towel.)  I repeated this method working from the top to the bottom of the cake and then around the sides.  It took awhile to get the smoothness I desired, but it worked!  Don't believe it?  I didn't either at first.  Here's proof:


I was thrilled with how the cake turned out, and clearly, so was the groom!


Chocolate Crusting Buttercream Icing
Adapted from Cake Central

Makes enough to frost 2 - 8" cakes

1 cup unsalted butter, softened
1 cup Crisco all-vegetable shortening
1 tablespoon pure vanilla extract
1/4 teaspoon kosher salt
2 pounds (8 cups) powdered sugar
1 cup unsweetened cocoa
1/2 cup heavy whipping cream

*Variation: to make a vanilla buttercream I omitted the cocoa powder.

In the bowl of a stand mixer (or with a handheld mixer) cream the butter, shortening, vanilla and salt until smooth and no lumps remain.

In a separate bowl, sift together the powdered sugar and cocoa.  Alternately, you can pulse 1/3 of each at a time in a food processor to sift and combine.

Add 1/3 of the powdered sugar mixture to the butter mixture and beat on medium-low until combined.  Add 3 tablespoons of the cream and mix on low until combined.  Repeat with remaining powdered sugar and cream until desired consistency and sweetness is attained (you may not need all of the powdered sugar and cream, this makes a very very sweet icing).

If you want to color the icing, do this after your desired consistency is reached.  Then add a few drops of dye at a time until the icing is the color you desire, keeping in mind that it will be slightly darker once it has crusted.

If you are not using the icing right away cover with a damp paper towel and put in the fridge.  When you are ready to use it whip it with your mixer for one minute.

Ice the cake, smoothing it with an offset spatula as much as possible.  Allow to air dry or put in the fridge for at least 15 minutes.  When the frosting is set (it doesn't come off on your finger when you touch it) you can use the VIVA paper towel method described above to smooth the frosting.  Once you've smoothed the cake, you can add decorations, or you can simply...

EAT IT!!


Friday, June 22, 2012

60 Years Young (and English Toffee Cookies)

Two Saturdays ago we celebrated this guy:


That's my Dad and he turned 60 this month.  60, and boy has he lived so fully all 60 years of that life.  What an inspiration, and someone I admire to my very core.

My Dad is one awesome dude.  He is first and foremost a family guy.  That is the heart and soul of his being. He is also a giver.  He gives of his time freely and without hesitation.  Along with that, he seems to have an unlimited amount of energy which is infectious and inspires others to give just a little bit more.  He is a writer, a joker, a hard worker, an A+ waffle maker, inspiring, optimistic and absolutely unconditionally loving.  And all of these qualities were highlighted by the 80 guests that showed up for his birthday party to celebrate him!  There were friends from all walks of his life...family, friends that went back to his high school days, former co-workers, neighborhood friends, church friends, friend friends, fellow writers...certainly I am missing some.  There was a beautiful toast written by my sister that brought tears to everyone's eyes.  The whole day  was a complete joy.

Oh, and there were cookies.  Lots and lots of cookies.  No one likes cookies more than my dad (although my husband and sister are close runner ups), so we had a cookie bar with 4 different kinds of cookies baked by my niece Paige, my sister Tessa and yours truly.  We made Peanut Butter, White Chocolate Macadamia Nut, Brown Butter Chocolate Chip, and Toffee cookies.  They were all delicious and perfect for the occasion, but the Toffee cookies were the ones that received the highest compliments.  Before I share the recipe, here are a few photos my dad doing what he does best...enjoying and loving his fam.

Photo credit: A Better Story Studios


I love you Dad!  So glad I could celebrate #60 with you!!


English Toffee Cookies
Adapted from Cookin' Canuck

Makes about 3 dozen

2 1/2 cups (350 grams) all-purpose flour
1/2 teaspoon baking powder
3/4 teaspoon kosher salt
1 1/2 cups (310 grams) granulated sugar, plus 1/2 cup for rolling dough
14 tablespoons (195 grams) unsalted butter, softened
2 eggs
2 teaspoons vanilla
1 cup Heath bits

Preheat oven to 350F.

Whisk together the flour, baking soda and salt in a medium bowl.

In a stand mixer fitted with the paddle attachment, add butter and 1 1/2 cups sugar.  On medium speed, beat for 5-7 minutes, or until the mixture is very light and fluffy.  Beat the eggs in one at a time, fully incorporating after each addition.  Add vanilla and mix on medium speed until thoroughly combined.

Turn the mixer to low and add the flour mixture 1/3 at a time, mixing until just combined after each addition.  Add the heath bits and mix on low for another 30 seconds, or until the bits are thoroughly incorporated.

Place additional 1/2 cup of sugar in a shallow bowl.  Roll the dough into 2 tablespoon sized balls and roll in the sugar.  Place dough balls on a cookie sheet lined with parchment paper about 1 inch apart.  Bake on middle rack of the oven for 14-16 minutes, or until lightly golden brown around the edges and slightly puffy in the middle.  Allow to cool on pan for 5 minutes then remove to a wire cooling rack.  These are amazing warm, right out of the oven, so next you should definitely...

Eat it!!


Wednesday, May 30, 2012

Foodzilla


Its true.  I have officially become Foodzilla.  I couldn't help it, I just snapped. Why?  Someone  said they were bringing a store-bought grocery store cake to an event where I was planning all of the food.  Uh-uh.  That ain't happenin' sister.  EVER.  Keep that crap as far away from me as you can, or I will go all crazy Kung fu Panda on your ass.  Not cool.

I was able to smooth things over after my initial reaction: pure rage.  We talked respectfully to each other, she heard my side of the story and promised me "no store-bought grocery store cake".

GAWD!  When did I turn into such a food snob?

In all fairness, I was jointly planning this event with someone who knew nothing of my skills in the kitchen, and in the end everyone was pleased.  The food was for a good friend's bridal shower and it all went off without a hitch.  The favorite of the day?  German Chocolate Cheesecake.  Uh huh.

Me and Ashley, the bride-to-be

It fills me with unreasonable amounts of joy to plan menus, cook for hours and then watch people devour my works of "art".  And this time I got to cook and create alongside my best girlfriend, her mom and our three amigos.  It was the most fun I've had in the kitchen in a long time.  If anyone else wants to get married  I'd be happy to throw you a shower...or at least make you a bunch of food!


German Chocolate Cheesecake
Adapted from Midwest Living
Serves 12-14

Cheesecake:
4 ounces bittersweet chocolate, chopped
9 graham cracker sheets
1/2 cup pecans
6 tablespoons unsalted butter, melted
1/4 cup sweetened flaked coconut
24 ounces cream cheese, softened
3/4 cup sugar
1/2 cup full-fat sour cream
2 teaspoons vanilla
2 tablespoons all-purpose flour
3 eggs

Topping:
1/2 cup (1 stick) unsalted butter
1/4 cup brown sugar, packed
2 tablespoons cream
2 tablespoons corn syrup
1 cup sweetened flaked coconut
1/2 cup pecans, chopped
1 teaspoon vanilla
2 ounces bittersweet chocolate, chopped

To make the cheesecake: Preheat oven to 350F.

Melt the chocolate in a microwave safe bowl on high power for 1 minute.  Stir the chocolate and if it isn't melted continue to microwave in 20 seconds increments until chocolate is smooth and melted.  Set aside to cool.

Add graham crackers to the bowl of a food processor and process until finely ground crumbs are formed.  Pour crumbs into a medium sized bowl.  Add pecans to processor bowl and process until finely chopped (make sure not to over-process or you will end up with pecan butter!) and add to the bowl with the graham cracker crumbs.    Add coconut to bowl, stir until well combined and then pour melted butter over the top.  Stir with spoon or using your hands until butter is thoroughly incorporated.  Press into the bottom of a 10-inch springform pan.  Bake for 8-10 minutes or until slightly browned.  Set aside.

Increase oven temperature to 375F.

In the bowl of a stand mixer beat cream cheese, sugar, sour cream and vanilla on medium speed until thoroughly combined, about 2-3 minutes.  Add the flour, beat well.  Add the eggs and cooled chocolate and beat until just combined.

Pour cream cheese mixture on top of the crust and bake for 45-50 minutes, or until the center appears to be almost set when you jiggle it.  Cool on a wire rack for 30 minutes.

To make the Topping:  In a small saucepan, melt butter.  Add brown sugar, cream and corn syrup.  Cook over medium heat until bubbly, stirring constantly.  Stir in the coconut, pecans and vanilla.  Remove from heat and allow to cool 5 minutes.  Melt the chocolate in a microwave safe bowl and set aside to cool.

Using a knife, gently trace the inside of the pan to release the cheesecake from the sides, then loosen the side of the springform pan and remove it.  Spread the coconut topping over the cheesecake (the cheesecake will still be warm).  Using a spoon, drizzle the melted chocolate over the coconut.  Garnish with a few whole pecans if desired.

Put the springform ring back on the cheesecake, then cover with plastic wrap and refrigerate for at least 3 hours before serving and then...

Eat it!!!


Thursday, April 26, 2012

Milk Bar Grasshopper Pie


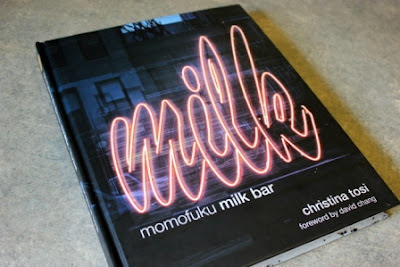
I have a wicked crush on a girl.  And my husband is ecstatic about it.  (And no...don't even go there.)  This is not a crush born of carnal need or lust.  It is a crush born of sugar, chocolate and a woman who is so full of baking genius it makes me gush with love.  Many of us are familiar with her, and if you are, you probably have a crush too.  Christina Tosi is simply amazing. 

Best baking cookbook I have ever laid eyes on.
I have seen Christina's (we can be on a first name basis, right?) recipes flying around the Internet lately.  After I saw the first one I knew I was in love.  Her recipes are incredibly involved with a multitude of steps to get to the final product.  Making one of her recipes is challenging and time-consuming and exactly what I crave when I devote my day to the kitchen.


These desserts are why my husband is happy about my crush.  He isn't jealous and he doesn't feel displaced in the least bit.  Desserts have been pouring into this household, and he's never one to complain about having sweets around.

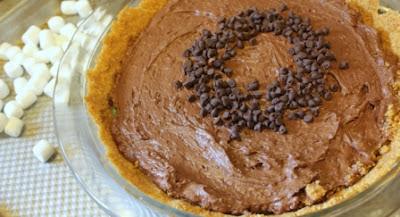
The Grasshopper Pie was the first thing I chose to make when I got my grubby little hands on this book.  Regarding the level of difficulty, this was one of Christina's easier recipes. It still took some time, but it was fairly straightforward as far as baking techniques go.  I'm not going to lie...this pie was incredibly rich.  Like make-your-head-hurt sugary sweet.  It was awesome.  We figured out that if it is served from the refrigerator rather than at room temperature though, it mellows the sweetness and suddenly it is not just awesome, but swoon-worthy.


PRINT THIS RECIPE!

Milk Bar Grasshopper Pie

Graham Cracker Crust:

1 1/2 cups (90 g) graham cracker crumbs
1/4 cup (20g) dried milk powder
2 tablespoons sugar
3/4 teaspoon kosher salt
4 tablespoons (1/2 stick) unsalted butter, melted
1/4 cup (55g) heavy cream

Grasshopper Pie:
4 1/2 ounces 72% chocolate, roughly chopped
6 tablespoons unsalted butter
2 large eggs
3/4 cup (150g) sugar
1/4 cup (40g) all-purpose flour
3 tablespoons dutch-process cocoa powder
1/2 teaspoon kosher salt
1/2 cup (110g) heavy cream
2 tablespoons (20g) mini-chocolate chips
1/2 cup (25g) mini-marshmallows

Mint Cheesecake Filling:
2 ounces white chocolate
2 tablespoons grapeseed or canola oil
2 1/2 ounces (75g) cream cheese, softened
2 tablespoons powdered sugar
1/2 teaspoon peppermint extract
1/4 teaspoon kosher salt
2 drops green food coloring

Mint Glaze:
1 ounce white chocolate
2 teaspoons grapeseed or canola oil
scant 1/8 teaspoon peppermint extract
1 drop green food coloring

Preheat oven to 350F.

Make the graham cracker crust: Whisk graham cracker crumbs, milk, sugar and salt in a medium bowl to thoroughly combine.  Whisk the butter and cream together and add to the dry ingredients.  Using your hands, toss all the ingredients together to evenly coat.  As you are tossing, it will start clumping together.  Press it together with your finger tips and it should hold its shape.  If it doesn't, add up to an additional 1 1/2 tablespoons of melted butter until desired consistency.

Add 1 1/4 cups (110g) of graham cracker crumb mixture to a 10-inch pie pan.  Working with your hands press the mixture on the bottom and up the sides of the pie pan.  Set aside.

Make the chocolate filling: Combine butter and chocolate in a small bowl and microwave for 30 seconds.  If mixture is not mostly melted, microwave an additional 20-30 seconds.  Use a spatula to stir ingredients together until silky and smooth. 

Combine the eggs and sugar in a stand mixer fitted with the whisk and whip for 3-4 minutes.  You will know they are done when they reach the ribbon state, which Christina describes as this: detach the whisk and dunk it into the egg mixture.  Wave it back and forth like a pendulum and the mixture should form thick silky ribbons that fall and then disappear into the mixture.  Continue whipping mixture until it reaches this state.

Change stand mixer attachment to the paddle.  Add the melted chocolate mixture into the eggs and paddle briefly on low and then increase the speed to medium for one minute or until the entire mixture is completely brown with no streaks remaining.  Scrape down the sides of the bowl with a spatula.

Add flour, cocoa and salt to the egg and chocolate mixture and paddle on low for 1 minute or until no lumps of dry ingredients remain.  Scrape down the sides of the bowl with a spatula. 

With the mixer on low, slowly pour in the heavy cream and mix for 30-45 seconds or until the cream is fully incorporated and no white streaks remain.  Scrape down the sides of the bowl with a spatula.

Remove mixer bowl from mixer and gently fold in 1/4 cup (45g) of remaining graham cracker crust crumbs.

Make the mint cheesecake filling: In a heat proof bowl, combine the white chocolate and oil and microwave for 30 seconds. If mixture is not mostly melted, microwave an additional 20-30 seconds. Use a spatula to stir ingredients together until silky and smooth. 

Combine cream cheese and powdered sugar in a stand mixer fitted with the paddle and mix on medium-low for 3 minutes.  Scrape down the sides of the bowl.  With the mixer on low, slowly add the white chocolate mixture and paddle for 1-2 minutes or until completely combined.  Scrape down the sides of the bowl. 

Add peppermint extract, salt and food coloring to the mixer bowl and paddle for 1-2 minutes or until thoroughly combined and the mixture is consistently green.

Assemble the pie: Place the graham cracker pie shell on a baking sheet.  Pour the mint cheesecake filling into the pie crust and spread evenly over the bottom.  Pour the chocolate mixture on top of the mint filling and spread evenly to the edges.  Sprinkle the mini-chocolate chips in a bulls eye around the center and then the marshmallows around the outer edge of the pie. 

Bake for 25 minutes until the edges are slightly puffy and the center still jiggles just a little bit.  The marshmallows will be tanned and the chocolate chips will have just started melting at this point.

Cool the pie completely before adding the mint glaze.

Mint Glaze: In a heat proof bowl, combine the white chocolate and oil and microwave for 30 seconds. If mixture is not mostly melted, microwave an additional 20-30 seconds. Use a spatula to stir ingredients together until silky and smooth.  Stir in the peppermint extract and food coloring until completely homogeneous in color.  Allow to cool for 15-20 minutes.

Using a fork, dunk the tines into the mint glaze and dangle the fork over the pie to create crisscrossing lines on the pie.  Put the pie in the fridge for 4-6 hours before serving to thoroughly chill (Christina doesn't say to do this, so it is a preference on my part, but we found the pie was significantly less rich and much more delicious eaten this way).  Once the pie is thoroughly chilled, cut it into slices and...

EAT IT!!

I caught a little pie-snatcher in the act!

Sunday, March 25, 2012

Kitchie Tip: How to Make Chocolate Curls

Before getting to the promised task at hand, I have some majorly big business to address.  First, (I am still in a state of shock and disbelief) thank you so much to everyone that voted me into the FoodBuzz Top 9 on Friday!  The Dark Chocolate Mocha Buttercream Cake I made last weekend was both fun and therapeutic for me, and the fact that it made into the Top 9 was a major win for me.  So, thank you, thank you and thank you!  I actually started crying when I read the first email congratulating me on Top 9.  It means a lot.

Second, I have a winner for the OXO salad spinner giveaway I posted last week.  The winner was lucky number 5, jwfong, which random.org selected for me.  Congratulations!  I'll be in touch shortly. 

Now, onto the star of the show...chocolate curls (like the ones on top of my cake that made the Top 9, surely it was the curls that got it there).

How-to: Chocolate Curls

3 ounces chocolate (I used bittersweet)
1 tablespoon coconut oil (shortening can be substituted)

Melt the chocolate and coconut oil in the microwave in 30 second increments, stirring after each increment, until completely melted and smooth.

Using an offset spatula, spread the chocolate on an overturned rimmed baking sheet, until smooth and evenly distributed.  Put the entire baking sheet into the freezer for 2 minutes. 


Remove from the freezer and, using an overturned metal spatula (turner), lightly push the chocolate away from you to form the curls.  If the chocolate is too hard, it will not curl and will look like this:

If this is the case, allow to sit at room temperature for 30-60 seconds more and then try again.  Repeat until the chocolate is the right temperature and the chocolate curls easily under the spatula, like so:


The chocolate will melt very quickly if touched, so try to to move the chocolate to a ceramic plate or other cool surface using the spatula.  Put them in the refrigerator as soon as possible and keep there until you are ready to use them.

Because the chocolate is spread so thinly, you will likely have to return it to the freezer several times during the curling process because it will begin to melt quickly.

When you are ready to use the curls, remove from the fridge and work quickly to decorate your cake/cupcake/etc. touching the curls as little as possible.  Once you've gussied up your awesome dessert with these curls, go ahead...

Eat it!!

Wednesday, March 21, 2012

Dark Chocolate Cake with Mocha Buttercream


I have been on a roller coaster of emotions these past few weeks.  If you've been keeping up with my posts, you know that life has had some ups and downs lately.  And these ups and downs have pulled me out of the kitchen and into real life.  This weekend I got to spend hours in the kitchen baking and decorating a cake for a friend's birthday and at the end of it I felt revived and renewed.  After spending hours on my feet I felt energized and truly alive for the first time in weeks.  I feel so fortunate to have something in my life that brings me (and others, for that matter) such joy.  I am breathing in gratefulness this week.  Life is good.  Oh is it good.

And so was this cake.  Actually, this cake was beyond good...it skyrocketed right past good, great, excellent and amazing, and fell unscathed into the lap of perfect.  This cake was all sorts of intense.  Four layers of dark chocolate cake....with layers of bittersweet espresso ganache...and mocha buttercream...topped with toffee and chocolate curls. 


I had an obscene amount of fun making this cake.  I love being challenged with a new recipe.  I love finding recipes with an absurd amount of steps that would have a  non-baker running away in terror.  I love when the end product looks and tastes as amazing as the amount of time I put into it.  Let's just say, this cake fulfilled the baking nerd in me.

I also got to try my hand at making chocolate curls which filled me an irrational amount of giddiness.  The tutorial for the chocolate curls can be found here.  Such a fun easy way to gussy up a cake.

This was a conglomeration of several recipes.  The cake came from my all-time favorite baking book flour by Joanne Chang, the frosting and ganache were adapted from Southern Living and the idea for toffee and chocolate curls came from this little brain of mine.   This is definitely a special occasion cake because it takes some time, but believe me, it is worth every second you put into it. 


PRINT THIS RECIPE!

Dark Chocolate Cake with Mocha Buttercream & Toffee

Dark Chocolate Cake

Note: The cake can be made up to a week ahead of time.  Bake, allow to cool and then wrap tightly in plastic wrap and freeze.  Remove from the freezer about an hour before you are going to frost it.

1/2 cup (60 grams) dutch-processed cocoa
1 ounce (28 grams) unsweetened chocolate, finely chopped
1 cup boiling water
1 3/4 cup + 2 tablespoons (225 grams) cake flour
1/2 teaspoon kosher salt
1 teaspoon baking soda
1 1/2 cups brown sugar, packed
1 cup (2 sticks) unsalted butter, softened and cut into 1-inch pieces
1/4 cup (60 grams) creme fraiche
2 eggs
2 egg yolks

Preheat oven to 350F.  Butter, flour and line the bottoms with parchment paper of two 9-inch cake pans.

Combine cocoa powder and unsweetened chocolate in a small heat-proof bowl.  Pour the boiling water on top and whisk until completely smooth.  Place in the fridge for 45 minutes, whisking every 15 minutes,  until cooled to room temperature.

Combine flour, salt, baking soda and brown sugar in the bowl of a stand mixer fitted with the paddle, and mix until combined.  Add the butter and beat on low speed for 30-40 seconds, or until the mixture resembles a dough and is thoroughly combined.

Whisk the creme fraiche, eggs and yolks in a small bowl.  With the mixer on low, slowly pour the creme fraiche mixture into the dough until thoroughly combined.  Turn the mixer up to medium high and beat for 2 minutes until light and fluffy.  Stop the mixer and scrape down the sides of the bowl, then return the mixer speed to low.  Slowly pour in the cooled chocolate mixture.  Stop the mixer and scrape down the sides of the bowl, then mix on medium for 30-40 seconds until the chocolate is completely incorporated and evenly distributed in the batter. 

Pour the batter into the prepared pans.  Bake 30-40 minutes, or until a toothpick inserted in the middle comes out with just a few crumbs sticking to it.  Allow cakes to cool completely on a wire rack in the pan.  Once cooled, invert the pan on a flat surface and peel off the parchment paper.

Meanwhile....while you are waiting for your cakes to cool.

Mocha Buttercream Frosting

1/2 cup (70 grams) all-purpose flour
3 Tablespoons unsweetened cocoa powder
3 Tablespoons instant espresso powder
1 1/2 cups half-and-half
1 1/2 cups (3 sticks) unsalted butter, softened
1 1/2 cups powdered sugar
2 teaspoons vanilla extract

In a small saucepan, whisk together flour, cocoa, espresso powder and half-and-half.  Whisk constantly over medium heat for approximately 5 minutes or until thickened (it will resemble a pudding).  Transfer to a small bowl and cover the surface with plastic wrap to avoid forming a skin.  Set aside and allow to cool to room temperature, about 45 minutes.

When the mixture has cooled, beat butter and powdered sugar in a stand mixture fitted with the paddle attachment, until light and fluffy, about 4 minutes.  Slowly add the cooled cocoa mixture on low speed until thoroughly combined.  Add vanilla and beat on low for 20 seconds to combine. At this point the mixture should resemble whipped cream (dreamy creamy mocha whipped cream!).

While you're waiting for the buttercream to cool do this...

Dark Chocolate Espresso Ganache

2 tablespoons espresso powder
1 teaspoon granulated sugar
1/4 cup hot water
12 ounces dark or bittersweet chocolate, finely chopped
1 1/4 cups heavy cream
1 tablespoon butter

In a small bowl, combine the espresso powder and sugar.  Add hot water and stir to combine.  Set aside.

In a small saucepan, heat the cream over medium heat until just boiling, then quickly remove from the heat.  Pour the cream over the chocolate in a bowl and whisk until smooth and no chocolate chunks remain.  Stir in the butter and 3 tablespoons of the espresso mixture.  (The rest of the espresso mixture can be discarded.)

Allow ganache to stand at room temperature for 1 hour or until it is thick enough to spread.

Decorations

2 Heath bars, coarsley chopped
Chocolate Curls

Assembly

Simple Syrup - boil 1/2 cup sugar & 1/2 cup water for 2 minutes (the simple syrup isn't completely necessary, but I find it adds a lot of moisture to my cakes and is a simple way to really amp up the cake)

Note on cutting cake layers: There are definitely different camps on this, but I like to freeze my cakes for 20 minutes before cutting them.  Because the cake is firmer, I find it easier to work with and much easier to cut into layers. 

Cut each cake in half lengthwise so that you have 4 layers.  Put your first layer on a cake stand and brush generously with simple syrup.  And add enough ganache to thinly cover the top of the cake.  Next add 1/3 of the mocha buttercream on top of the ganache and gently spread to cover the top of the cake.  Repeat these steps two more times and end with an unfrosted cake layer on top, brushed with simple syrup.

Add several large dollops of the remaining ganache to the top of the cake and spread with an offset spatula on the top and down the sides of the cake.  Continue adding small dollops of ganache to the cake until the top and sides are completely covered with ganache.


Now, this next part is up to you and how perfectionistic you are.  Smooth the sides of the cake with an offset spatula until desired smoothness is acheived.  You can spend a lot of time on this, so get it as smooth as you can tolerate, and then move on.  See Exhibit A...not perfect, but it'll do.
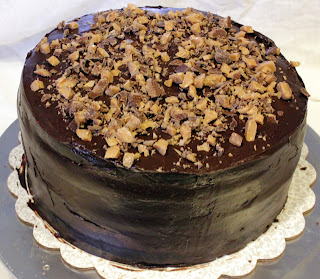
This is Exhibit A.

Now, toss a bunch of Heath on the top and wherever else you want to put it (try to stop yourself from putting it in your mouth, you'll get plenty of that later!).  Decorate with chocolate curls and finally...finally...you get to...

Eat it!!!
Monday, February 20, 2012

Brown Butter Lemon Bars


If you know anything about my culinary passions, you know:

1. That I believe a little brown butter can make anything taste better.
2. Lemon desserts do not pass these lips. 
3. Ever.
4. Never Ever.
5. Unless...(see #1 above).

I heard your collective gasp, and I understand your confusion.  But let me help you understand, its pretty easy.  A little brown butter can make anything taste better.  Or even good.

I don't know what it is about me and lemons, but we just don't dig each other when it comes to desserts.  I 'll add lemon to risottos, pastas, roasted vegetables and dips.  But please, keep that fruit away from my sweets.  Except for this one time.

Here's the deal, I am not going to say I love these lemon bars and they are my new favorite dessert.  But, they were pretty good.  I ate a whole bar and I didn't even cry when I remembered I wasn't going to hit any chocolate. 

So, why, you ask, would I choose to make something I am so obviously at odds with in the first place?  I made them for this lady.  My mama. 


She and my dad were here visiting this past weekend and since her birthday was just a few days prior I had to make her something extra special.  Lemon bars were that thing.  More on that awesome visit to come, but now, without further ado...I present to you:

BROWN BUTTER LEMON BARS!


PRINT THIS RECIPE!

Brown Butter Lemon Bars
Adapted from Baking by James Peterson

16 servings

DOUGH
2/3 cup (94 grams) all-purpose flour
2/3 cup (94 grams) cake or pastry flour
1/2 cup powdered sugar
1/4 teaspoon kosher salt
1/2 cup cold unsalted butter, cut into 1/2" cubes
1 egg

LEMON CURD
1/2 cup unsalted butter
3 large eggs
3/4 cup granulated sugar
1 tablespoon lemon zest
3/4 cup fresh lemon juice (about 6 lemons)

Make the dough: combine the flours, powdered sugar and salt in a food processor and pulse until combined, about 5 pulses.  Add the butter and egg and process for 20-30 seconds or until the mixture just comes together.  Flatten into a disk shape, wrap in plastic wrap and refrigerate for at least 15 minutes.

In a medium saucepan, melt the butter on medium heat until light brown and the butter has a nutty fragrance.  Watch the butter carefully and remove from the heat as soon as it browns to avoid burning.  Set aside to cool for 10 minutes.

Preheat the oven to 450F. 

Make the lemon curd: Bring a saucepan of shallow water to a simmer.  In a heatproof bowl that will fit over the saucepan, add eggs and sugar and whisk for 2 minutes until the mixture is pale yellow.  Whisk in lemon zest, juice and brown butter and then set the bowl over the simmering water.  Whisk constantly for 8-10 minutes until the mixture starts to thicken.  Remove from the heat and cover with plastic wrap.  Press the plastic wrap onto the surface of the curd to avoid forming a skin.  Set the lemon curd aside.

Roll the dough out into a 9" x 9" square and then press the dough into an 8"x8" baking dish.  Press the extra inch of dough up the sides and then trim any excess dough to form an even crust all the way around.  Bake for 20-25 minutes, or until the crust is light golden brown.  Let the crust cool for 15 minutes on a wire baking rack.

Spread the warm lemon curd over the warm pastry and let cool for 30 minutes at room temperature.  Cover and refrigerate for at least two hours and up to one week, before serving.

Cut into squares and...

Eat it!!

Thursday, December 15, 2011

Pecan Vanilla Shortbread


I am beginning to think that I misnamed this blog.  After looking at all the recipes I've posted I am thinking perhaps it should have been Cookie Coo.  Thoughts? 

Well, that's a joke of course (or, maybe not) but, I have been just a little obsessed with cookies recently.  I have only posted a small portion of the cookies I've made...so please hold onto those pants with the elastic waist a little longer, you know the ones.  I'm not quite finished with my cookie gluttony.

These shortbread cookies have been a favorite of mine for years now.  They are super simple and super tasty.  Plus they have real vanilla bean beat into the dough.  Anything that uses a real life vanilla bean gets an A+ from me.  I love the depth of flavor it adds to baked goods and I also love how purdy the black specks look in the dough.  See?


I make this shortbread every year to give away for goodies around the holidays; and I always make extra for myself.  These freeze very well and I usually make enough to last me several months past Christmas.  And the best (or worst?) part?  They taste even better straight out of the freezer so need to unthaw.  Just snatch and snarf!


Jazz these babies up with a little colored sugar and you've got some festive shortbread you can take out on the town. 

PRINT THIS RECIPE!!

Pecan Vanilla Shortbread
Adapted from Food and Wine
Makes Approx 30 cookies

3/4 cup (75 grams) pecans, coarsely chopped
1 1/4 sticks (10 tablespoons) unsalted butter, softened
1/2 cup (55 grams) powdered sugar
1/2 vanilla bean, split lengthwise and seeds scraped
1/2 tsp pure vanilla extract
1/2 tsp kosher salt
1 1/2 cups (210 grams) all purpose flour
1/4 cup sugar in the raw or other coarse sugar
1 egg yolk, lightly beaten

Preheat oven to 350F.  Spread the pecans on a baking sheet and toast for 5-7 minutes or until nuts are lightly browned and fragrant.  Set aside to cool.

In the bowl of a stand mixer fitted with the paddle attachment, beat butter, powdered sugar, vanilla bean and seeds, vanilla extract and salt on medium speed until light and fluffy.  Reduce speed to low and add the flour in three batches until incorporated.  Remove the vanilla bean from the bowl and stir in the pecans.

Transfer dough to plastic wrap and use wrap to help guide and roll the dough into a 1 1/2 inch thick log.  Wrap the log in the plastic and refrigerator the dough for 1 hour and up to 3 days.

Line two baking sheets with parchment paper and set aside near your work area.  Spread raw sugar on a cutting board.  Brush the chilled dough log with the egg yolk and roll in the sugar, using your fingers to coat the log entirely with the sugar.  Slice dough into 1/2 inch rounds and place on prepared baking sheets, approximately 1 inch apart.

Bake the cookies in the 350F oven for 20 minutes or until the edges are lightly golden brown.  Rotate baking sheets halfway through baking if baking two sheets at a time.

Transfer cookies to a wire rack to cool and then...

Eat it!!!


Tuesday, December 13, 2011

Champagne Cake Balls


I have made 100 cake balls in the last 4 days. 100.  You know, for a girl who doesn't like cake, I sure bake a lot of cake.  Although, it turns out that its that ooey gooey pasty icky store bought cake I don't like.  And all this time I thought it was cake I didn't like...but it turns out its just the source.  Sorry cake for hatin' on you all these years!  Can we be friends?

We had another GNIPL on Friday evening and I deemed a theme for the evening.  Appetizers!  Yeah, so why not cake balls?  That's a tasty appetizer.  Okay, okay, I made an appetizer that I will share with you all soon, because it was awesome.  But, I also made these cute little cake balls, and since I got so many requests for this recipe on Friday night I thought I'd post it first.  You know that old saying, "Life's unexpexted, eat dessert first"?  That applies to blog posts and baking recipes too.  I'm surprised you didn't know that.

I had a taste tester...

I got this recipe from Laura at Sprint 2 the Table and made some adaptations to suit my tastes.  Her review was that these were a very doughy cake ball and I wanted something a little more cakey.  So, I added egg whites and oil to acheive this result. 


Besides the final product, the very best part of making these cake balls is the leftover champgne.  One generous glass to be exact.  That I am drinking right now.  While munching on a cake ball.

These were a hit!  I hope you enjoy them as much as me and my little cake monster did!


Champagne Cake Balls

PRINT THIS RECIPE!!

Makes 30 cake balls

Cake Ingredients:
1 box white cake mix
1 1/4 cups champagne (I used medium-dry)
3 egg whites
1/3 cup canola oil

Frosting Ingredients:
1/2 cup + 1 tbsp champagne
1 stick unsalted butter, at room temperature
1 1/2 cups (165 grams) powdered sugar

Candy Coating:
1 pound white or bittersweet chocolate (or both)


Preheat oven to 350F.  Grease a 9 x 13 pan with butter or cooking spray and set aside.

To make the cake, combine all cake ingredients and beat with an electric or stand mixer until well combined, about 2 minutes.  Pour the cake batter into the prepared pan and bake for 20-25 minutes or until a toothpick inserted in the middle comes out clean.  Set on a cooling rack and allow to cool completely.

To make the frosting, bring 1/2 cup champagne to a boil and then reduce to a simmer until it is reduced to 2 tbsp, about 10 minutes.  Allow to cool completely (I made the cake and the champagne reduction and, to allow adequate cooling time, moved onto the rest of the recipe the next day).

Add butter and powdered sugar to the bowl of a stand mixer and beat on medium speed until light and fluffy, about 4 minutes.  Reduce speed to low and slowly add the cooled champagne reduction and 1 tbsp champagne.  Increase speed to medium and beat for one minute or until well combined.

In a large bowl, crumble the cake and then add 1/2 cup of frosting.  Using your hands, incorporate the frosting into the cake until well combined.  If the cake seems dry keep adding frosting 1 tbsp at a time, up to an additional 1/4 cup, until it reaches your desired consistency (you can do some taste tests here until the taste suits you).

Using your hands, roll the cake mixture into 1 tbsp sized balls and place on a cookie sheet lined with wax paper.  Refrigerate for 1 hour or freeze for 20 minutes to firm up cake balls.

In a microwave safe bowl melt the chocolate in 30 second increments, stirring in between until almost melted.  Stir vigorously and if the chocolate is still not melted, microwave in 15 second increments until melted and smooth.

Using a spoon, take one chilled cake ball at a time and place in the melted chocolate.  Spoon chocolate over the cake ball to coat.  (Don't roll the cake ball in the chocolate or you will create crumbs that don't look pretty on your final product.)  Remove cake ball from the chocolate with spoon and very gently return to wax paper on the cookie sheet.  Repeat with remaining cake balls.

Allow to chill in the refrigerator for 1 hour and then...

Eat it!!