My dear friend Ashley got married about a month ago (you know the one who's shower I turned into
Foodzilla while planning?) to a man made perfectly for her. This wedding was positively oozing with love, good vibes, and the absolute knowledge that this was a marriage made to last.
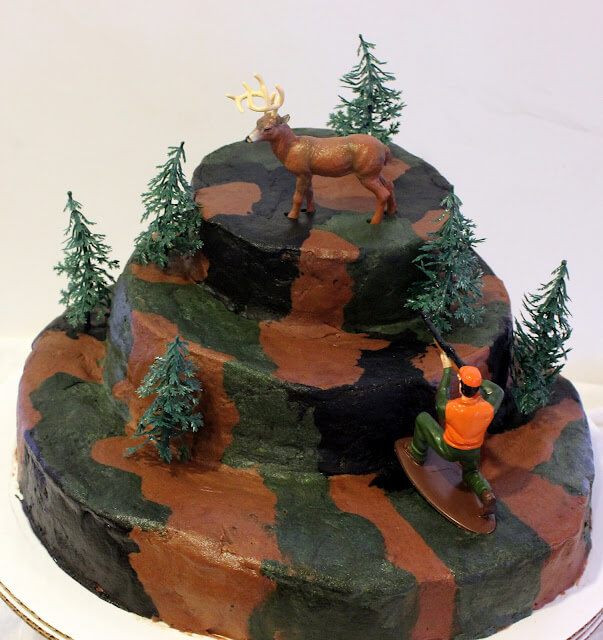
As all good brides do, Ashley put a ton of time, energy and forethought into exactly how she wanted their big day to be executed. One of these details was in the form of a groom's cake for her beloved. Since the groom is an avid hunter she encouraged him to put bits of camouflage into the decor of their wedding, but each time he shied away from it. Little did he know she had a major camo surprise planned for him, and she asked me to make it for him. A camouflage cake!
GULP. I mean, this was my wedding cake debut! And it was for one of my dear friends' wedding no less. Oh yeah, and besides the occasional birthday cake for a friend's birthday, I don't really have much cake decorating experience. But I was up for the task...and I think I did alright.
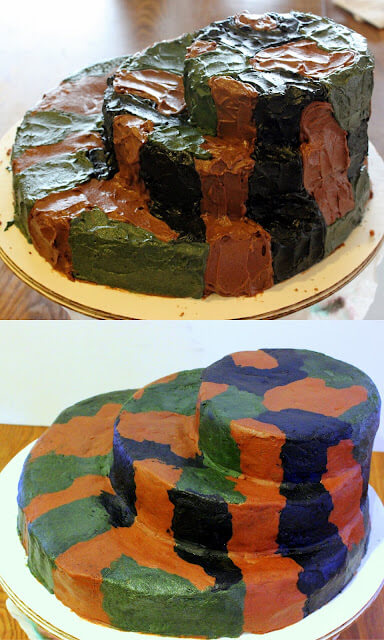
I was a little intimidated and did crazy amounts of research and several renditions of this cake before the big day. After my obsessive research (and a miserable attempt at camo fondant) I decided to use the VIVA paper towel method (great video tutorial
here) for smoothing the icing.
For this method you need to use a crusting buttercream recipe, the one I used is below, and a roll of VIVA paper towels. Why VIVA? Because they do not have a pattern on them and are perfectly smooth. I started by piping the design for the camouflage pattern onto the cake. Then, I put the whole cake in the fridge for about an hour for the frosting to set up, or crust. You will know that your frosting has crusted when you touch the frosting with your finger and it doesn't leave any on your finger. It should feel slightly stiff but it won't be hard.
Once the frosting had crusted I used a VIVA paper towel and laid it over the top of the cake and very lightly smoothed it with my finger. (Some people use an offset spatula, but I found that my finger left a smoother finish because I could feel the bumps and lumps beneath the paper towel.) I repeated this method working from the top to the bottom of the cake and then around the sides. It took awhile to get the smoothness I desired, but it worked! Don't believe it? I didn't either at first. Here's proof:
I was thrilled with how the cake turned out, and clearly, so was the groom!
Chocolate Crusting Buttercream Icing
Adapted from
Cake Central
Makes enough to frost 2 - 8" cakes
1 cup unsalted butter, softened
1 cup Crisco all-vegetable shortening
1 tablespoon pure vanilla extract
1/4 teaspoon kosher salt
2 pounds (8 cups) powdered sugar
1 cup unsweetened cocoa
1/2 cup heavy whipping cream
*Variation: to make a vanilla buttercream I omitted the cocoa powder.
In the bowl of a stand mixer (or with a handheld mixer) cream the butter, shortening, vanilla and salt until smooth and no lumps remain.
In a separate bowl, sift together the powdered sugar and cocoa. Alternately, you can pulse 1/3 of each at a time in a food processor to sift and combine.
Add 1/3 of the powdered sugar mixture to the butter mixture and beat on medium-low until combined. Add 3 tablespoons of the cream and mix on low until combined. Repeat with remaining powdered sugar and cream until desired consistency and sweetness is attained (you may not need all of the powdered sugar and cream, this makes a very
very sweet icing).
If you want to color the icing, do this after your desired consistency is reached. Then add a few drops of dye at a time until the icing is the color you desire, keeping in mind that it will be slightly darker once it has crusted.
If you are not using the icing right away cover with a damp paper towel and put in the fridge. When you are ready to use it whip it with your mixer for one minute.
Ice the cake, smoothing it with an offset spatula as much as possible. Allow to air dry or put in the fridge for at least 15 minutes. When the frosting is set (it doesn't come off on your finger when you touch it) you can use the VIVA paper towel method described above to smooth the frosting. Once you've smoothed the cake, you can add decorations, or you can simply...
EAT IT!!
